<security-realm name="SAMLRealm">
    <authentication>
        <jaas name="ejb-remoting-sts"/>
    </authentication>
</security-realm>
Introduction
PicketLink provides ways to protect your EJB endpoints using a SAML Security Token Service. This means that you can apply some security to your EJBs where only users with a valid SAML assertion can invoke to them.
This scenario is very common if you are looking for:
-
Leverage your Single Sign-On infrastructure to your service layer (EJBs, Web Services, etc)
-
Integrate your SAML Service Providers with your services by trusting the assertion previously issued by the Identity Provider
-
Any situation that requires the propagation of authorization/authentication information from one domain to another
Process Overview
The client must first obtain the SAML assertion from PicketLink STS by sending a WS-Trust request to the token service. This process usually involves authentication of the client. After obtaining the SAML assertion from the STS, the client includes the assertion in the security context of the EJB request before invoking an operation on the bean. Upon receiving the invocation, the EJB container extracts the assertion and validates it by sending a WS-Trust validate message to the STS. If the assertion is considered valid by the STS (and the proof of possession token has been verified if needed), the client is authenticated. 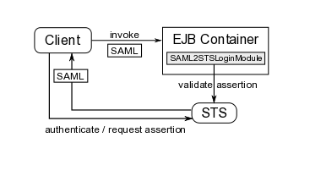
On JBoss, the SAML assertion validation process is handled by the SAML2STSLoginModule. It reads properties from a configurable file (specified by the configFile option) and establishes communication with the STS based on these properties. We will see how a configuration file looks like later on. If the assertion is valid, a Principal is created using the assertion subject name and if the assertion contains roles, these roles are also extracted and associated with the caller's Subject.
The client must first obtain the SAML assertion from the PicketLink STS or you Identity Provider. This process usually involves authentication of the client. After obtaining the SAML assertion, the client includes the assertion in the security context of the EJB request before invoking an operation on the bean. Upon receiving the invocation, the EJB container extracts the assertion and validates it by sending a WS-Trust validate message to the STS. If the assertion is considered valid by the STS (and the proof of possession token has been verified if needed), the client is authenticated.
On JBoss, the SAML assertion validation process is handled by the SAML2STSLoginModule. It reads properties from a configurable file (specified by the configFile option) and establishes communication with the STS based on these properties. We will see how a configuration file looks like later on. If the assertion is valid, a Principal is created using the assertion subject name and if the assertion contains roles, these roles are also extracted and associated with the caller's Subject.
Configuration
This section will cover two possible scenarios to protect and access your secured EJB endpoints. The main difference between these two scenarios is where the EJB client is deployed.
-
Remote EJB Client using JNDI
-
EJB Client is deployed at the same instance than your EJB endpoints
Remote EJB Client using JNDI
Before starting, please take a look at the following documentation Remote EJB invocations via JNDI.
The configuration described in this section only works with versions 7.2.0+ and 7.1.3+ of JBoss Application Server.
If your endpoints are accessible from remote clients (in a different VM or server than your endpoints) you need to configure your JBoss Application Server 7 to allow use a SAML Assertion during the InitialContext creation.
Basically, the configuration envolves the following steps:
-
Add a new Security Realm to your standalone.xml
-
Create a Security Domain using the SAML2STSLoginModule
-
Change the Remoting Connector to use the new Security Realm
Add a new Security Realm
Security Realms are better described in the JBoss Application Server Documentation.
Edit your standalone.xml and add the following configuration for a new Security Realm:
The configuration above defines a Security Realm that delegates the username/password information to a JAAS Security Domain (that we'll create later) in order to authenticate an user.
When using the JAAS configuration for Security Realms, the remoting subsystem enables the PLAIN SASL authentication. This will allow your remote clients send the username/password where the password would be the previously issued SAML Assertion.In our case, the password will be the String representation of the SAML Assertion.
Make sure you also enable SSL. Otherwise all communication with the server will be done using plain text.
Create a Security Domain using the SAML2STSLoginModule
Edit your standalone.xml and add the following configuration for a new Security Domain:
<security-domain name="ejb-remoting-sts" cache-type="default">
    <authentication>
        <login-module code="org.picketlink.identity.federation.bindings.jboss.auth.SAML2STSLoginModule" flag="required" module="org.picketlink">
            <module-option name="configFile" value="${jboss.server.config.dir}/sts-config.properties"/>
            <module-option name="password-stacking" value="useFirstPass"/>
        </login-module>
    </authentication>
</security-domain>
This configuration above defines a Security Domain that uses the SAML2STSLoginModule to get the String representation of the SAML Assertion and validate it against the Security Token Service.
You may notice that we provided a properties file as module-option. This properties file defines all the configuration needed to invoke the PicketLink STS. It should look like this:
serviceName=PicketLinkSTS
portName=PicketLinkSTSPort
endpointAddress=http://localhost:8080/picketlink-sts/PicketLinkSTS
username=admin
#password=admin
password=MASK-0BbleBL2LZk=
salt=18273645
iterationCount=56

#java -cp picketlink-fed-core.jar org.picketlink.identity.federation.core.util.PBEUtils 18273645 56 admin
#Encoded password: MASK-0BbleBL2LZk=
This security domain will be used to authenticate your remote clients during the creation of the JNDI Initial Context.
Change the Remoting Connector Security Realm
Edit your standalone.xml and change the security-realm attribute of the remoting connector:
<subsystem xmlns="urn:jboss:domain:remoting:1.1">
    <connector name="remoting-connector" socket-binding="remoting" security-realm="SAMLRealm"/>
</subsystem>
The connector configuration is already present in your standalone.xml. You only need to change the security-realm attribute to match the one we created before.
EJB Remote Client
The code above shows you how a EJB Rremote Client may look like:
// add the JDK SASL Provider that allows to use the PLAIN SASL Client
Security.addProvider(new Provider());

Element assertion = getAssertionFromSTS("UserA", "PassA");

// JNDI environment configuration properties
Hashtable<String, Object> env = new Hashtable<String, Object>();

env.put(Context.URL_PKG_PREFIXES, "org.jboss.ejb.client.naming");
env.put("java.naming.factory.initial", "org.jboss.naming.remote.client.InitialContextFactory");
env.put("java.naming.provider.url", "remote://localhost:4447");
env.put("jboss.naming.client.ejb.context", "true");
env.put("jboss.naming.client.connect.options.org.xnio.Options.SASL_POLICY_NOPLAINTEXT", "false");
env.put("javax.security.sasl.policy.noplaintext", "false");

// provide the user principal and credential. The credential is the previously issued SAML assertion
env.put(Context.SECURITY_PRINCIPAL, "admin");
env.put(Context.SECURITY_CREDENTIALS, DocumentUtil.getNodeAsString(assertion));

// create the JNDI Context and perform the authentication using the SAML2STSLoginModule
Context context = new InitialContext(env);

// lookup the EJB
EchoService object = (EchoService) context.lookup("ejb-test/EchoServiceImpl!org.picketlink.test.trust.ejb.EchoService");

// If everything is ok the Principal name will be added to the message
Assert.assertEquals("Hi UserA", object.echo("Hi "));